You can easily add Employees to Appogee HR either one at a time or in bulk. This guide takes you through the options of importing users in bulk. To find out how to add your employees to Appogee HR one at a time, take a look at the following article: Adding New Employees.
There are two ways to add Employees to Appogee HR in bulk. Click each option ton navigate to the relevant instructions.
CSV Upload tool
To upload your users by CSV go to Add Employee > Import from CSV.
Download the template of the CSV and input the data about your employees. The CSV tool will only import a maximum of 100 users at once. If you are looking to import more than 100 users you will have to do this in stages. The Template will map the data in each column with the fields in Appogee HR to create an employee's profile. The template has the following titles:
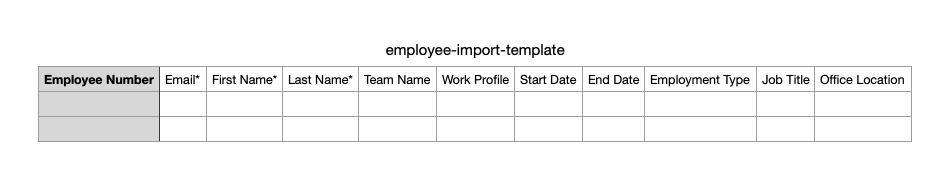
Those marked with asterisks are mandatory.
| Mandatory Columns | Optional Columns |
| Employee Email Address | Employee Number |
| Employee First Name | Team Name |
| Employee Last Name | Work Profile |
| Start Date | |
| Job Title | |
| Office Location |
NOTE: Employee Number field should be left blank if you would like the system to automatically generate the employee number based on your configuration (more information here). You should only populate this column if you would like to provide a custom Employee Number.
NOTE: it's not possible to create Teams or Work Profiles using the CSV import tool, so these will need to be created before you initiate an upload.
When you've filled out the CSV template, make sure to save a copy as .csv file, upload it using the Upload & Import button. The system will validate the CSV file and look for any discrepancies or errors.

Once validated, the next page will give you a summary of the upload - how many users the tool has found on the CSV file, any users with validation errors and users you are able to import. The spreadsheet must be uploaded as a CSV file.

Errors which deem users are not importable are as follows:
Missing Email Address
Missing First Name
Missing Last Name
Email Address is already taken by another user in the system
Email Address domain has not been verified
Fixable issues are as follows:
Team missing
Team does not exist/is not recognised
Work Profile missing
Work Profile does not exist/is not recognised
Job Title Missing
Start Date Missing
Access Leave/HR/Goals is missing
Access Leave/HR/Goals is not 'Y' or 'N'

Assign Team
The next step is to Assign Employees to their Team and Work Profile. If you input this information in the CSV template already, this page can just be used to check if it's all correct. Make changes by clicking the pencil icon.
Select Teams and Work Profiles using the dropdowns.

If you have a large number of people in one Team or Work Profile, you are able to use the buttons to assign them all at once. Select the users by ticking the boxes on the left and then click either Assign Team or Assign Work Profile.
A pop-up will appear where you can choose the Team or Work Profile from the dropdown and then click OK.
When all users have been assigned a Team and Work Profile, click Next.
Profile
Optionally add employees' Job Titles and Start Dates.
This can be completed later, however it is advised that correct start dates are added for employees as this will aid the leave calculations for them.
If the employee has a start date which falls in the current Leave Year and you have the Pro-Rata formula enabled, you will see that their allowance changes to accommodate this.

When you're happy with the changes on this page, click Next.
Configure Login
Choose whether the employees have access to login straight away or activate their log in at a later date. You can also optionally send a Welcome Email, which will invite them to log in. If you choose not to enable login or send a Welcome Email, you can do this another time from Roles & Access.

Once you're happy with the changes on this page, click Next. You will see a dialog asking you to confirm if you're happy to import your users. Once done your employees will then be added to the system.
Import users via Google Workspace or O365 integration
If you have integrated with Google Workspace or Office 365 you will be given the option to import users from the specific third party app.
For the following example, we will be using Appogee HR integrated with Google Workspace
Go to Add Employees > Google Workspace Import.
The wizard will go through the key steps with you to import any users in your domain who do not have an Appogee HR account.

Select the users you wish to import, click Next.
Assign them to a Work Profile and a Team.
If more than one employee belongs to the same Work Profile or Team, you can add these in bulk by selecting the users on the left and click Multi Assign.

Click Next.
Then, configure their profiles by giving them a Job Title, Start Date & Office Location

Click Next.
Configure their login and the employees will be added to the system.

Click Next.

The final screen will show you a summary of your import, click Finish & Import to add the employees to Appogee HR.